Set Up a New Station
There are several steps to setting up a new station in OLIVE and requires coordination with field crews that configure and deploy data logging and telemetry hardware.
It is important that the steps are completed in order:
- Add station on the Stations page.
This automatically adds the station to ArcGIS Field Maps.
- Add station to a Project on the Projects page
- Configure telemetry on the Loggernet page, IP Configurations tab
- Add file configurations on the Loggernet page, Files tab.
If necessary, add a new column layout on the Column Layouts tab, otherwise use an existing pattern
- (For Sensit and TEOM stations) Add an instrument on the Assets page.
The pages discussed here contain a basic data grid with cross-filtering options. See the sections on working with data grids and filtering with charts for more information.
Add a Station
Most stations require the same basic information:
- Name
- Type
- Install Date
- Latitude and Longitude
Sand flux monitoring stations need one additional value:
- Default met tower (for sand flux evaluations)
CSC-only stations need two additional values:
- Default met tower (for sand flux evaluations)
- Alt Sensit Name (for calculating sand flux since there is no co-located Sensit)
Names are not required to follow a specific pattern, but there are established (and legacy) conventions for sand flux and met towers:
- 11XX: stations associated with T1A-1 MDCE BACM area
- 13XX: stations associated with Channel MDCE BACM area
- 16XX: stations associated with Tillage with BACM Backup
- 17XX: stations associated with Brine
- 19XX: stations associated with Dynamic Water Management
- 21XX: stations associated with variance areas or special studies
- XX5X: Meteorological towers
From the Stations page, click the  button. Populate the values as appropriate, leaving Decommission Date and Last Data Retrieval Date blank. If the station is maintained is maintained by LADWP, check the Is Checked checkbox. Leave Decommisioned unchecked.
Leave Is Active unchecked until the station is full operational. The station will still appear on the field map and be able to connect through the telemetry system, but it will be excluded from alerts and data will not be shared with GBUAPCD while inactive.
Add a Station to a Project
Adding a station to a project will associate its data with all other stations in that project. This is most relevant to generating monthly compliance reports. It can also serve as a convenient grouping for related stations.
From the Projects page, switch to the Project Stations tab, click the button, and select a project and station name from the dropdown lists.
Stations added to the Confidential Data project will not be shared with GBUAPCD.
Configure telemetry
This requires coordination with field staff that are configuring dataloggers and radios!
You will need to following information to set up telemetry for a new station:
- What type of radio. There are current two types in use at Owens Lake, 5GHz IP radios made by Ubiquiti, and 900MHz RF radios. The type of radio will determine which tab you enter data in, IP Configuration or RF Configuration.
- What base station the station will connect to. This is usually determined by field staff.
IP Configuration
From the IP Configurations tab, click the + button at the top right of the data grid. Select the appropriate base station.
Base Stations
The base stations have descriptive names based on what part of the lakebed they reach. You can check the Base Station tab to see a list of the descriptive names and what station each is linked to. You can also open up ArcGIS Field Maps on your phone or tablet to view the base station locations if you are unsure which one the station will be closest to.
IP Addresses
Selecting a base station will automatically update the list of available IP addresses for the radio and the data logger, since each base station is on its own subnet. By default, the first available IP address will appear, but you can use the dropdown menus to select any available IP address. These may have been set by the field crew already so be sure to coordinate.
General IP Config Settings:
- Radio Type: IP
- Pakbus Address: ask field crew
- Logger Name (it is important to enter the name exactly as it appears below):
- CR3XX = CR300
- CR1000
- CR2XX = CR200
- CR800
- Polling Schedule: only certain schedules are appropriate depending on the station type
- Solar-powered site radios (e.g. Sand flux monitors) are only powered on twice a day (1100-1300 PST; 0000-0100 PST), so always select "Twice daily regular"
- Met stations and TEOM stations can be configured to collect more frequently
- Do not use "One-way hole collect" or "random" for IP radios.
- Device IP Port: usually 6785, confirm with field crew
- Radio IP Port: usually 443, confirm with field crew
- Is IP Logger: yes (this is a legacy setting)
RF Configuration
From the RF Configurations tab, click the button. Select the appropriate base station.
- Radio Type: RF
- Pakbus Address: ask field crew
- Logger Name (it is important to enter the name exactly as it appears below):
- CR3XX = CR300
- CR1000
- CR2XX = CR200
- CR800
- Polling Schedule:
- RF radios have very low bandwidth and the base station can only communicate with one station at a time, so it is usually advisable to select "Twice daily random."
- If data are required frequently, choose "One-way hole collect". This is not advisable if the data will be shared with GBUAPCD as the data may not arrive in order by time step.
Set a File Configuration
Configuring a station and its telemetry settings will start the process of downloading data from the remote datalogger. The file configuration tells OLIVE how to interpret the incoming data, categorize it, and insert it into the database.
The majority of the time, new stations will follow pre-established patterns and you may simply copy and paste information from another station of the same type. In these instances, follow the Basic instructions below.
Occasionally, a new type of station or way of collecting data at a station will come up. In this case, a new pattern for recognizing incoming data files and/or a new file layout will need to be set up and you will follow the Advanced instructions below.
Basic
On the Loggernet page, Files tab, find an existing record, or, in most cases, set of records, that matches the type of the new station (e.g. sand flux monitor).
The Files tab is connected to the Page Filter feature. Click  at the top right of the page to open the filter tray. Select the appropriate station type, then select an existing station for which file configurations exists as well as the new station you are setting up.
Add new records, one for each file pattern and column layout definition for the site you are trying to match. You will need to update the regular expression pattern File Name column to match your new station. This is typically the station name.
For example, for a new hypothetical sand flux monitor, 1760, filter the data grid on File Name to look for another 17XX station, 1701.
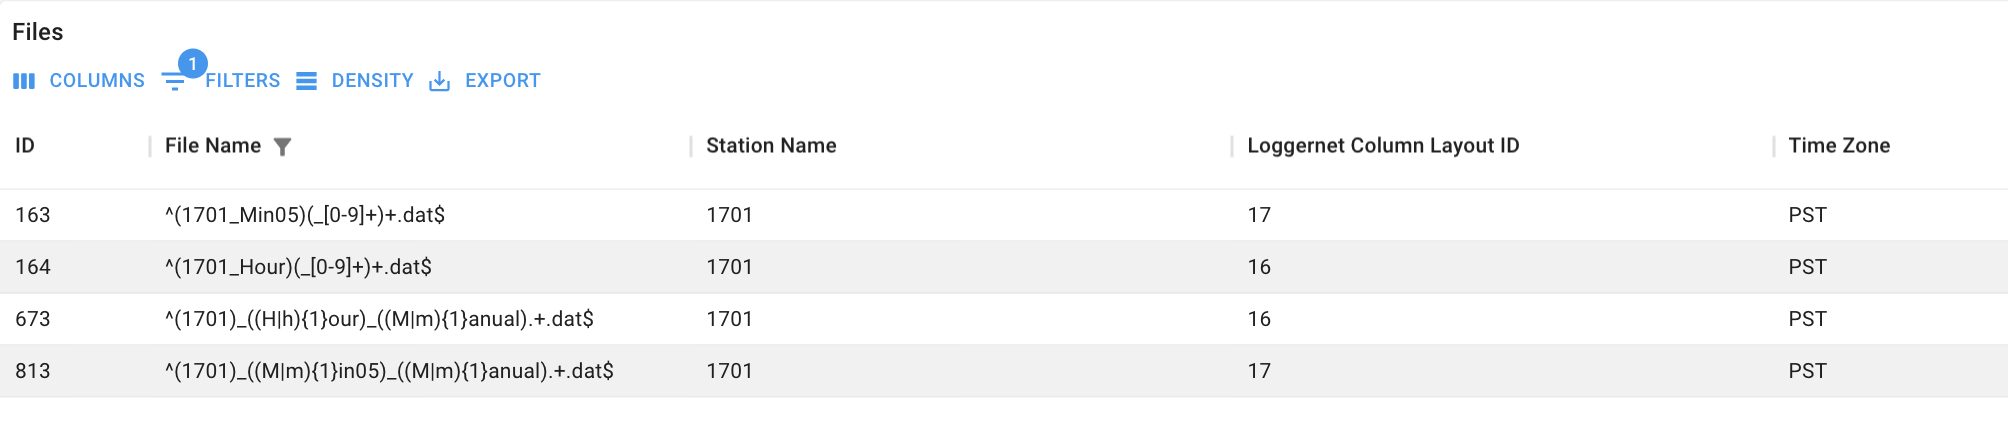 Station 1701 has 4 file patterns, 2 each for 5-minute and hourly data for automated and manual uploads. Add four new records, one at a time, copying the File Name column and changing "1701" to "1760" in the string. Choose 1760 from the station dropdown list, and set the Loggernet Column Layout ID and Time Zone to match.
Advanced
Please proceed with care when developing new patterns and layouts. A new layout must be created first before assigning it to a file pattern.
This advanced process is also appropriate for adding data from sources outside the system that will not use telemetry. Current examples of such stations include CIMIS and GBUAPCD stations.
Add a new column layout
Column layouts are decoded using JSON strings that define a file's content. The file must be comma-delimited (CSV), and have a datetime string that matches one of the From the column layout page, make sure the name and description field are visible. Add a record, pasting in the JSON string that describes the layout.
- ts:
- type: Integer ID value of the date type, found on the Loggernet page, Date Formats tab
- position: column(s), starting at 1, containing parts of the datetime value
- data:
- position: column number, starting at 1, containing the data
- quantity_id: Integer ID of the quantity, found on the Quantities page
- header: Integer value identifies the number of header rows in the file
{
    "ts":{
        "type": 1,
        "position": [1, 2, 3]
    },
    "data":[
        {
            "position":7,
            "quantity_id":42
        },
        {
            "position":8,
            "quantity_id":43
        },
        {
            "position":9,
            "quantity_id":44
        }
    ],
    "header": 0
}
Create a new file pattern
File patterns rely on regular expressions, which uses a set of nested codes to match string patterns. This website, https://regexr.com, is helpful for learning about and testing regular expressions.
A brief introduction to working with regular expressions is also included here.
The most important thing to keep in mind when developing a new pattern is to ensure that it will not match more than one file. In other words, the regular expression has to be restrictive enough so that it will be truly unique.
Create a new data quantity
The following requires administrative privileges. In most cases, configuring quantities correctly requires close coordination with field personnel that will be configuring and installing the datalogger that will record the measurements.
In the OLIVE system, a quantity refers to a unique type of data, such as a measurement, that is associated with a station. Uniqueness is determined by
- The value being measured (e.g., temperature)
- The unit of measurement (e.g. °F)
- The frequency of the measurement
Other ways to differentiate a quantity may be present in the quantity name, such as
- The height above the ground
- The type of instrument used to make the measurement
Quantities are managed on the Quantities Page. To add a new quantity, first determine if the units and the type of measurement, referred to as the Data Stream Profile, already exist. If not, start by adding a new unit definition on the Units tab, then a new measurement type on the Data Stream Profile tab.
Next, add a new quantity on the Quantity tab:
- Enter a Name: the convention is value_frequency[_height]
- Select a Data Stream Profile name
- Enter the expected frequency of the data in milliseconds
Assign an Asset to a Station
The Assets Page tracks serial numbers for select instruments owned by LADWP. The page is organized into two tabs: Assets, which is the running list of instrument serial numbers, and Asset Deployments, which logs start and end dates for when a specific serial number was deployed at a station.
Currently, the system tracks Sensits (sand motion monitors) and TEOMs (particulate monitors). When an instrument, such as a Sensit, is changed at a station, the site visit log will indicate that an Instrument Swap occurred and the field crew will note the old and new serial numbers.
A new Asset Deployment record must be created for the OLIVE system to recognize an instrument swap, which is critical for accurately calculating virtual sand flux.
To record a new Asset Deployment:
- Check to see if the new serial number already exists in the Assets log.
- If the asset already exists:
- On the Asset Deployments tab, filter by the asset name to confirm that the asset is not recorded as already deployed at another station (i.e. end date is blank/null).
- On the Asset Deployments tab, filter by the station name to look for any existing entries. If an entry exists for the old asset, enter an end date for that record that corresponds with the start of the site visit.
- Enter a new asset-deployment record with a start date matching the end of the site visit. Leave the end date blank.
- If the asset does not exist:
- Enter a new asset record for the serial number of the new instrument (Sensit or TEOM).
- On the Asset Deployments tab, filter by the station name to look for any existing entries. If an entry exists for the old asset, enter an end date for that record that corresponds with the start of the site visit.
- Enter a new asset-deployment record with a start date matching the end of the site visit. Leave the end date blank.